While this can sound like a long, arduous, and labor-intensive task, raising a subfloor is surprisingly simple.
To do it, you need to follow a few simple steps:
- Remove your current flooring
- Identify your subfloor
- Measure the gap you need to fill
- Raise the subfloor with the appropriate material
Once you’ve done these four steps, your subfloor will be at the perfect height. So how do you raise the height of a subfloor? Let’s start at the beginning — removing your current flooring.
1. Remove Your Current Flooring
Before you can access your subfloor, you have to get rid of your current floor. This can entail a number of different tasks, depending on the material of your floor. Most modern homeowners will encounter one of two kinds of flooring. We’ll start with the more complicated flooring to remove — carpet.
Carpet
Carpet is challenging to remove for a number of reasons. First, the structure of carpet has changed substantially, especially if you’re working on a house from the 1960s or 1970s.
Modern carpet often includes a top layer, a cushion layer, and in some cases a waterproof layer under that. Altogether, you’re looking at three different materials to remove to create a single floor.
If you’re dealing with a house that’s 50 years old or more, however, you’re dealing with a different kind of carpet. These houses most likely feature carpet that’s in two layers — the top layer of carpet and the bottom layer of adhesive cushion.
In general, it’s not too hard to remove the first type of carpet. Just grab your preferred cutting edge, slice out a long cut of carpet, detach it from the walls, and roll it up.
But if you’re dealing with older carpet, you’re in for a much longer job. This often entails cutting the carpet loose, pulling it up to detach it from the adhesion layer, and rolling up the top layer separately. Then you’ll have to use a spade or other implement — we prefer a shingle shovel — to rip the adhesive layer off of the subfloor itself.
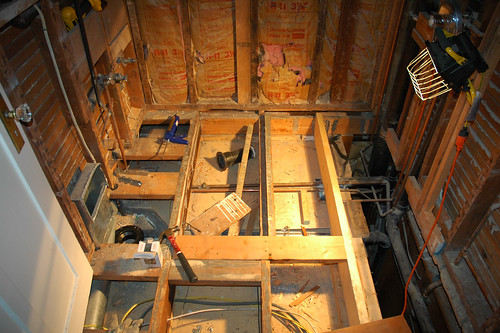
With that cleaned off, you should have visual confirmation of your subfloor. Next, let’s talk about hardwood.
Hardwood
Hardwood is significantly different from carpet. Hardwood it not only a different material, it also contains vastly different chemicals from carpet. These chemicals include sealers and stains, among others.
This is why it’s in your best interest to remove hardwood in planks as much as you can. Cutting hardwood has a tendency to make the wood splinter, especially if you’re working with softer woods like pine.
Oak and ash are hardier, but they can still split if they’re old enough. These splinters can send sawdust and flakes of sealer into the air. While neither is toxic, they’re definitely allergens, and they can wreak havoc on someone’s sinuses.
However, the good news is that hardwood is almost always nailed — not screwed — into the subfloor. This means you just need a claw hammer or a prybar to take up the nails, and your floor will come right out.
This also means that you’ll almost never see a hardwood floor in a basement. Why? Because basement subfloors are a different material from other subfloors.

2. Identify the Material of Your Subfloors
There are two main types of subfloors — plywood and cement.
Plywood is used in pretty much every floor of a house. The floor that you walk on in a first, second, or third story is almost always resting on plywood. This is because plywood is cheap, durable, and ugly. In other words, it’s the perfect structural material for something you’ll never see. That makes it ideal for subfloors.
But basements (and sub-basements) are different. Their subfloors are often cement. This is because the “subfloor” of a basement is often the foundation of a house itself. That means it’s a lot harder to work than the subfloor of another level of a house.
Some homes, like ranch homes, may also have a cement subfloor throughout the entire home. In fact, some geographies — like those in flood-prone locations — might only have a cement subfloor because having a basement is too much of a liability. As a result, the entire home sits on a slab foundation, which is almost always cement.
However, there’s good news here — because you’re looking to add subfloor to either of these surfaces, you don’t have to worry too much about the individual materials. Instead, the more important thing is to measure the gap to fill.
3. Measure the Gap You Need to Fill
In almost every scenario, the gap you’ll need to fill with a subfloor will be between a stair landing and the floor above or below it. This means you’ll have to alter the height of your subfloor in the range of 1/4” to 1”, and you’ll almost never need to raise a subfloor a whole inch at a time.
Take a measuring tape and get a quick read of what you have to fill. Remember, you’re going to add a floor on top of this, so factor the thickness of the floor into your measurement as well. For example, if you have a 1/4” gap between the stair landing and the subfloor and you’re planning to install 1/8” thick vinyl flooring, then you only need to raise the subfloor by 1/8”.
Once you have your measurements, it’s time to raise your subfloor.
4. Raise the Subfloor with the Appropriate Material
In almost all cases, your problem can be solved with plywood. Plywood is available in almost every thickness imaginable, and the most common thicknesses are 1/8” and 1/4”. Sometimes, you may find a lumberyard that carries 1/2” thick plywood, but it’s fairly rare since it’s so heavy.
If you find yourself needing thicker materials, it’s usually easier and more cost effective to double the amount of plywood you purchase so that you can stack the boards on top of one another.
Then it’s time to pick your hardware. Your plywood needs to be mechanically attached to the subfloor itself. The best choice here is to pick all-purpose screws. 1 1/8” long drywall screws work nicely, but you may need 2” screws if you’re doubling up your subfloor.
After you have your hardware, it’s time to screw the boards into place. If you’re doing this into a wooden subfloor, you can use a screw every 6” – 8” and you’ll be fine.
However, if you’re working with cement, you have a much harder task ahead of you. In this case, you’ll probably need thicker, industrial-level screws to raise your subfloor. This is especially true for older homes since cement gets harder as it ages.
We recommend using a tool like a rotary hammer to pre-drill what you need and then using concrete screws to fit everything into place. This means working with cement takes a lot longer than wood, but the end result is the same. Once you’re done, you have a freshly-raised subfloor.
Good luck!