
There are a few different ways you can cut pegboard. Some are easier than others and some are much more effective. The issue most people encounter when cutting pegboard is frayed edges. This occurrence isn’t so much an issue of effectiveness but more appearance. Meaning you can hack away at it with a pair of safety scissors till it breaks in half and hang it up on the wall and it will work just fine for hanging your tools. But it’ll look like … fecal matter.
So if you’re the type of guy who doesn’t care about aesthetics at all, then then by all means just bust out the loppers and cut it up. But if you’re the true craftsman type who wants their shop to be pristine, down to the last detail, you’re going to want to stick around a while longer.
So What Makes The Cut?
Of the more considerate ways to cut pegboard (which there’s a few) my preferred method requires:
-Saw Horses or Table
-Tape Measure
-Pencil
-Circular Saw (jigsaw is also acceptable but I believe to be slightly less accurate)
-Straight Edge (needs to be at least as long as the section you intend to cut)
-Clamps
-Painters Tape
All items you should probably have lying around your shop floor or stuffed in totes (considering you don’t have pegboard up yet).

How Do I Do It?
Start by setting the pegboard on your sawhorses or table face up (face meaning whichever side you intend to be “facing” out towards you, not the side going against the wall). Measure whatever length of pegboard you wish to cut with the tape measure and mark it on the board with the pencil on both ends of your cut.
Once you’ve marked all the corners of your cut, put the painters tape on the board centered on your marks. Flip the board over, back up, so that the side with the tape is facing down.
Now mark your corners again. Be certain to mark from the same edges as you did on the face so that your marks are aligned with the tape on the other side. This is so that our blade doesn’t cause the board to splinter or swell around the edges.
Next measure the distance from the edge of the guide on your circular saw to the blade and mark that same distance on your board outside the edge of your mark on both ends of your cut and clamp your straight edge to the outer mark of your saw’s guide so that when you put the guide up against the straight edge your blade is lined up to your mark aligned with the tape. Once you’ve confirmed the blade is positioned in the right place, cut the board keeping your guide firm against your straight edge and flat on the board to maintain a smooth, straight cut on your edges.
Repeat these steps to any more cuts you need to make on the board or any other boards if you have a lot of pegboards to put up. Remove the tape from your good piece of pegboard (unless you prefer the choppy blue border on half of your pegboard) and you’re ready to hang it up on the wall.
Hanging Hack
Now that you’ve got all your pieces cut all that’s left is to hang it up. Simple enough, right? True … but not as easy as you might think.
To use your pegboard effectively, you need to be able to peg your hooks through the holes in the board (ergo the name), and to do that, your pegboard must have holes. If you just screw the board to the wall, that creates an issue as the wall is going to cover the back of the holes. If you’re certain this is going to be a permanent fixture on your wall, you could just take a drill bit the same size as the pegs and drill out each hole you plan to peg into the wall itself. But we lose a lot of versatility in our workspace this way, not to mention a wall full of holes. Or if you don’t want to drill all the holes through the wall but only some, we’ll be constantly drilling new holes to move our hooks as our supply of tools and organizational desires are constantly changing. Again, you’ll wind up with a wall full of holes then.
Alternatively, we can build a frame for pegboard using 1×1 or any spare wood we have lying around. Simply glue, nail, or secure the pegboard with small screws, (shorter than our frame board) to the frame boards around the back of the board on all edges and between any seams for larger sections.
Once your board is secured to its frame get some screws that are at least the length of your board including the frame, plus, 1 1/8″, to account for the drywall (5/8″) and 1/2″ into your studs or alternative fastener. Use a stud finder to… well find studs, and spare your wife, friend, kid, or whoever is assisting you the bit where you point it at yourself making beeping sounds (they’ve seen it too many times already—and if you’re a woman reading this, please excuse my Neanderthal sexism in assuming you’re a man).
Mark the studs on the wall then on your board in such a way that when the board is positioned on the wall to your preference the marks align. (Use a screw to confirm that the stud is actually there because stud finders are not known for their accuracy, and what it thinks is a 2×4 may very well be a water line conduit or who knows what. Best to approach this before drilling through your pegboard so you don’t end up with any unnecessary, ugly holes in your board’s face.)
If hitting studs isn’t an option just put the board up on the wall and run screws right into the drywall, pull them out and take down the board, then put a drywall anchor in each hole and run your screws back through the pilot hole into the anchors.
Congratulations
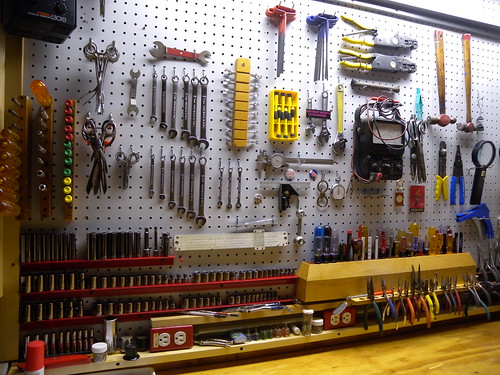
You should now be looking at a beautiful piece of pegboard on your wall. The optimization is endless. What will you hang in this new storage space? I hope you figured that out for the most part before you took on this project, but these ideas usually change once brought in the physical. Anyways, enjoy your newly expanded workspace and never stop learning new skills like how to cut pegboard. Good luck!
